
Adding extensions to an iOS app is something that Delphi doesn’t support natively, but there is a way (with a few hurdles) to get this working in your Firemonkey app.
The first part of this article is based on this excellent Grijjy Blog article which I highly recommend reading: https://blog.grijjy.com/2018/11/15/ios-and-macos-app-extensions-with-delphi/
Introduction
First of all, I want to be clear that you can’t create extensions in Delphi (Pascal) directly, so you will need to learn enough Objective C to create them natively in Xcode. You’ll do this alongside a host app (also written in Objective C through Xcode) to test your extension. How you do this is completely up to you, and there are a lot of excellent tutorials, so Google away.
I’ve successfully built Delphi apps with accompanying Today and Share extensions (written natively) but the principle should be similar for other extension types.
Once you have a native app with a working extension in Xcode, you can extract the extension from the built app, and embed that into your Delphi Project.
All of the above is covered in the Grijjy blog so I will summarise it below, but if you’d like a better explanation as to how and why this is the case, please refer to the blog post.
If you’re creating a Share Extensions to allow other apps to share into your Delphi app, I recommend this post as an explanation of how to set up bundle groups and a simple working sharing app:
https://www.technetexperts.com/mobile/share-extension-in-ios-application-overview-with-example/
The Stages
I won’t go into detail here about how to create the Extension or share data between that and your Delphi app, as this is covered in the Grijjy blog and tutorial included above. I will however go into details above what you do next which isn’t covered by the above.
The problem is that you can build and include your plugin easily in your Delphi app, but it won’t actually run on your device.
Why? because Delphi only know about the app not the extension, so only includes one provisioning profile when signing. The problem is that your extension requires a separate profile, so the app needs building with two which Delphi doesn’t support.
If you try building, you will see errors like this:
[PAClient Error] Error: E0776 error: exportArchive: “<extension-name>.appex” requires a provisioning profile with the App Groups feature.
To resolve this, you need to take over the signing process from Delphi and make the necessary calls to xcodebuild with the correct information. A little fiddly but not too difficult.
This article attempts to take you through the process.
Note: I haven’t gotten this working for development builds, only release builds at the moment as the flow is different.
This means that the only way to test your Delphi + extension is to build for the App Store in Release mode and upload to TestFlight. This isn’t too bad if you’ve already tested your extension with a test (host) app in Xcode first, so make sure you do that or you’ll waste a lot of time uploading builds to TestFlight!
If I manage to get the following process working for the development builds too, I will update this article.
Building your Extension and Host App
First, build the app. The basic sequence is as follows:
- Use Xcode to build a native iOS app.
Important – it MUST be created in Objective C not Swift. Delphi apps are effectively wrapped as Objective C apps so don’t play well with Swift extensions.
Also Important – the bundle identifier of the host app MUST be identical to your Delphi app (if it already exists at this point). The host app you’re creating here is a test app which is pretending to be your Delphi app so you can test the extension and data-sharing between the two. - Add an extension in Xcode (File > New > Target, then pick the extension type). The bundle identifier should be the same as the host app (step 1 above) but with a suffix specific to the extension. E.g. for an app “com.example.myapp” the extension should be “com.example.myapp.<extension_name>”.
- Build and test your extension in Xcode – make sure it works as expected.
TIP: If you want to share data between your host app and extension (very likely), the most Delphi-compatible way is to create a bundle group, then use NSUserDefaults in both your extension and Delphi app to transfer data.
How to do this on the Delphi side is included in the Grijjy blog, and how to do this from the Extension side is explained in the Share Extensions tutorial link. - At this point you need to have a working Objective C app with an extension that is working and tested.
Provisioning Profiles Setup
If your Xcode host app and extension are using Xcode Managed Signing (which is very likely) then you will need to create development and deployment profiles manually and use them instead, as Delphi can’t access the Xcode managed profiles.
To find out if you’re using Xcode managed signing:
- In Xcode, tap the top item in your files tree on the left to show the project details on the right
- In the Signing & Capabilities tab, tap on each item in the Targets list. You will see a checkbox for “Xcode managed signing”. If they’re checked you need to do the steps below to create profiles manually and use them in Xcode.
Manually creating your profiles
Note: You will need to follow these stages twice – once for your main app identifier (e.g. com.example.myapp) and once for the extension (e.g. com.example.myapp.shareextension) as extensions have their own app ID and therefore need their own profiles.
- Open developer.apple.com, sign in and go into Certificates, IDs and Profiles
- In the Profiles section, tap the + button.
- Select App Store under the Distribution area.
- Select your app ID
- Follow the remaining stages, then create and download the certificate at the end.
- Double-click the downloaded file to install it into Xcode.
- Repeat the above for the extension app ID so you have 2 provisioning profiles, once for each.
Once you have your profiles:
- Open Xcode (if not already open)
- Tap on the top item in the files tree on the left to see the profile information details.
- You will have 2 items in the Targets area – once for the host app and one for your extension. You need to do the following for both targets:
- In the Signing & Capabilities tab, click the “Release” option in the toolbar (where it says “All, Debug, Release”) and uncheck the “Automatically manage signing” option.
- Select your team (it may be blank) and then select the correct provisioning profile from the list. The two you created in the developer website should appear here and be shown as “eligible”.
- Repeat for both targets.
- Build and run your app in Xcode again and make sure if still works correctly.
- Now you need to Archive the app within Xcode via the Product > Archive option
- After a short while the Organiser window will open showing your archived app (most recent at the top).
- Select the most recent archive file, then “Distribute App” button
- Choose “App Store” then Export (not Upload).
- Complete each of the following steps to get your archive file. When asked, make sure to uncheck “include bitcode…” and choose the correct distribution profiles for your app.
At this point you’re ready to transfer your extension into Delphi.
Extracting your Plugins Folder
To extract the Plugins folder, open the folder where you exported the archive to.
Note that you will need the ExportOptions.plist file later, so don’t lose it!
- Rename the .ipa file to .zip and extract it.
- In the Payload folder will be a .app file you need.
- Right-click on the app file and Show Package Contents
- Copy the Plugins folder to your PC inside your Delphi Project folder.
The Delphi Side
Once the Plugins folder is in your Delphi project folder, you need to include all of the files from the this folder in your Deployment within Delphi.
NOTE: On a Mac, the Plugins folder looks like it only contains one file – “Extension.appex” or similar. This is really a folder, and will show as such when on Windows. You need to make sure you include every file within the “.appex” folder and its subfolders in the distribution of your Delphi app or it won’t work!
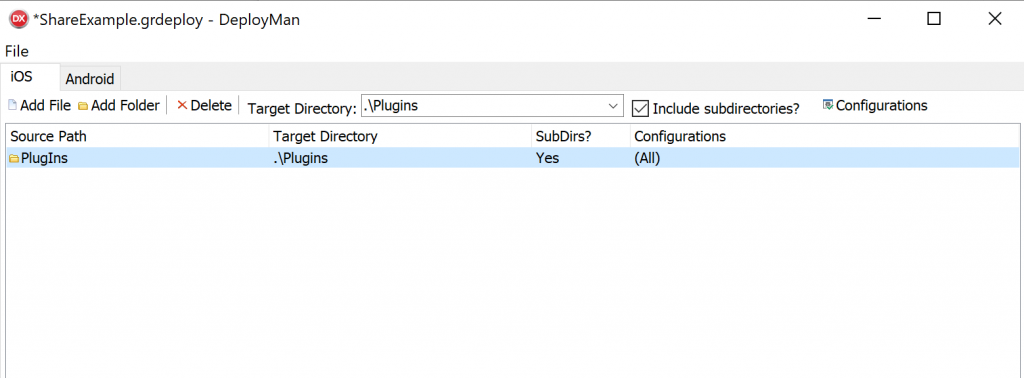
The easiest way to do this is to use the DeployMan.exe tool kindly provided by Grijjy:
https://github.com/grijjy/DelphiSocialFrameworks/tree/master/DeployMan
Run this tool, choose “Import .dproj” from the menu and select the .dproj for your Delphi app, then add the entire Plugins folder into the list.
Make sure that the Target Directory is set to “./Plugins” and Include Subdirectories is checked.
Also, tap the Configurations option in the top-right and make sure you choose Debug if the extension was build for development in Xcode, or Release if build using the Archive technique.
The reason for this is because building for Archive or for development (the play button in Xcode) uses different provisioning profiles so they are different folders.
Now File > Save Project and .dproj.
When you go back into your Delphi app it will detect the change and ask if you want to reload the project – say Yes!
Build and run your Delphi app. The bad news is that the extension still won’t work at the moment.
The trouble with profiles…
Delphi doesn’t support extensions for iOS app, which brings with it a big problem.
Extensions require separate provisioning profiles to the main app, so your app actually needs signing against two provision profiles, but Delphi only signs it against one as it doesn’t know any different.
If you try to perform a release build (for the App Store) through Delphi, it will generate an .app file containing everything you need but will be unable to sign it to generate the archive (.ipa) you will need to upload it to the App Store.
The error you will see will be something like this:
[PAClient Error] Error: E0776 error: exportArchive: "<extension-name>.appex" requires a provisioning profile with the App Groups feature.

[PAClient Error] Error: E0776 Error Domain=IDEProvisioningErrorDomain Code=9 ""<extension-name>.appex" requires a provisioning profile with the App Groups feature." UserInfo={IDEDistributionIssueSeverity=3, NSLocalizedDescription="<extension-name>.appex" requires a provisioning profile with the App Groups feature., NSLocalizedRecoverySuggestion=Add a profile to the "provisioningProfiles" dictionary in your Export Options property list.}
This is because it can only find a provisioning profile for the main app and not the extension.
For your app to work with an embedded extension, you will need to create a folder containing all the necessary files, then run xcodebuild manually to perform the archiving and signing process yourself on the .app file that Delphi generates.
The folder you are creating will have the same structure as a .xcarchive file (i.e. a temp subfolder and a Products subfolder into which your .app will be copied)
To perform the signing and archiving you need to create a folder containing 3 things:
- The .app file Delphi has generated ready for release (despite the error Delphi shows when building, the .app file is correct so copy it from your scratch folder)
- The exportOptions.plist file from the exported archive file described above which provides all the details about your app and references to the necessary provision profiles for both the app an extension.
- An info.plist file which is NOT the same as the ones generated in Delphi, so I’ve given details on this below.
For more info on the export procedure we’re following, see this article from Apple:
https://developer.apple.com/library/archive/technotes/tn2339/index.html#//apple_ref/doc/uid/DTS40014588-CH1-WHAT_KEYS_CAN_I_PASS_TO_THE_EXPORTOPTIONSPLIST_FLAG
The best approach is to create a shell script on the Mac to automate this, but that won’t be covered here.
Step 1 – get the .app file:
Build your app in Delphi for Release (App Store) if you haven’t already. It will fail with the error mentioned above, but that’s fine.
Next, open the scratch-dir folder on your Mac which Delphi builds into on the Mac. It’s usually here:
~/PAServer/scratch-dir/<name of Mac>In here you will see the .app file that Delphi generated for your project.
Wherever you prefer on your Mac, create a folder with the same name as your app file but with a .archive extension (e.g. “MyApp.archive” if your app file was MyApp.app).
Create a Products folder within it and copy the MyApp.app file into the Products folder.
Copy the exportOptions.plist from the exported archive into the root of the .archive folder.
Create a Temp folder inside the .archive folder. This is where the .ipa for upload to the App Store will be generated if all goes well.
Create a plist.info file as described below in the root of the .archive folder.
Once you’re finished, the folder will look like this:
– MyApp.archive/
– info.plist
– ExportOptions.plist
– Products/
– MyApp.app
– Temp/
Creating the info.plist file you need:
Create a file called info.plist and copy in the following template:
<?xml version="1.0" encoding="UTF-8"?>
<!DOCTYPE plist PUBLIC "-//Apple//DTD PLIST 1.0//EN" "http://www.apple.com/DTDs/PropertyList-1.0.dtd">
<plist version="1.0">
<dict>
<key>ApplicationProperties</key>
<dict>
<key>ApplicationPath</key>
<string>myapp.app</string>
<key>CFBundleIdentifier</key>
<string>com.example.myapp</string>
<key>SigningIdentity</key>
<string>Apple Distribution: teamname (teamID)</string>
</dict>
<key>CreationDate</key>
<date>2019-02-26T17:05:43Z</date>
<key>Name</key>
<string>myapp</string>
</dict>
</plist>
Replace the <Name> value, the <ApplicationPath> value and the <CFBundleIdentifier> values with those for your app. The CreationDate seems not to matter.
The <SigningIdentity> key value needs to be the full (common) name of the distribution certificate (not provisioning profile) the app was generated using. this will be one associated with the provisioning profile, and the name should be similar structure to what I included above.
If unsure about this, download the distribution certificate file from the developer.apple.com portal (from the Certificates section of the portal), then select it in Finder and press the Spacebar to preview it. The name you need is shown in the preview window as Common Name.
TIP: If, when generating the archive (described below) you see errors relating to badly formed or missing “method” keys, it will be due to the info.plist file being wrong.
Generating the Archive (.ipa)
In a Terminal window, run the following command, replacing <scratch-dir> and <appname> as appropriate for your Mac and project:
/usr/bin/xcodebuild -exportArchive -archivePath "<scratch-dir>/<appname>.archive" -exportPath "<scratch-dir>/<appname>.archive/Temp" -exportOptionsPlist "<scratch-dir>/<appname>.archive/ExportOptions.plist"The archive will be generated in the Temp folder, so at this point you can upload to Test Flight using Apple’s Transporter app.
I hope this was useful for all those who wish to run the gauntlet of Delphi and iOS extensions.
Happy Developing!
One thought on “iOS Extensions with Firemonkey”