
WordPress is used by 43% of websites worldwide, so it’s an obvious target for hackers looking to compromise a site. Unfortunately, for lots of reasons mentioned in this article, admins aren’t making this difficult enough for hackers so it’s common to hear of WordPress sites being powned, filled with malware or customer details stolen from a website.
The good news is that it’s easy to protect your WordPress site with a few simple steps, and everything I’m suggesting is free to implement so I hope you find it useful in your fight again the hackers!
I’m writing this to help those who may be concerned about WordPress security. I aim to provide some insight, tools and options to improve your site security. I recently decided to try and improve our site security from DDoS and hack attempts as it was starting to affect the availability of one of our product sites (thankfully we haven’t been hacked) and I knew there must be good ways to better protect it.
This article covers what I discovered, some background from my research, and suggestions based on what we implemented that seem to have helped.
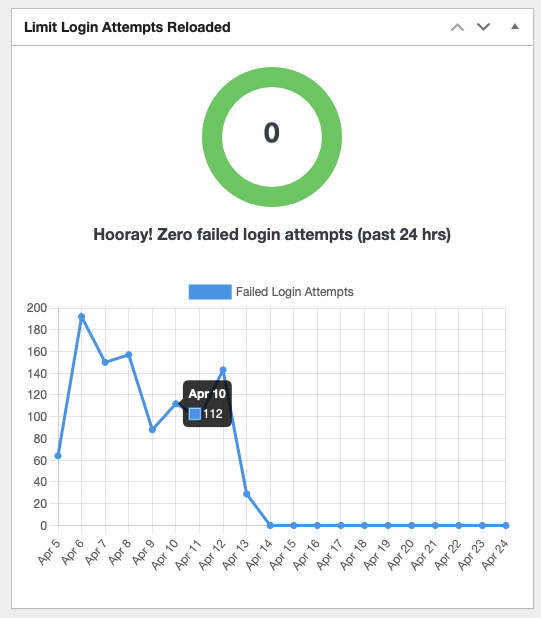
To start on a positive note, here’s the impact these changes made to our site:
Note: the details below are by no way exhaustive, as new attacks and techniques are invented every day. What is proposed here will give you a great fighting chance of avoiding being attacked but there’s still a small risk so you need to keep monitoring your site regularly for signs of attack and deal with any attempts as quickly as possible.
Attack Vectors
Before getting into what you can do to protect your site, it’s useful to understand what the 2 biggest risks are (and why), so you can see how hackers are compromising vulnerable sites.
1. Passwords
There are infinite combinations of letters, numbers and symbols that can be used to create a password, but somehow a hacker can still seem to “guess” those that are compromised. How do they do this?
First of all, they use an “most frequently used” attack. This means that they basically have a long list of the passwords that people often use, and try each one (automated with a bot often). Ever wondered why you shouldn’t use Password123? That’s because it’s item number 1 on this list!
Often they hacker will also try variants of these, so you may have used Password27 thinking that’s ok… nope. The hacker will try adding different incremental numbers to each password in the list because people tend to just add incremental numbers to their password each time they need to change it. Password17 becomes Password18 so it’s easy to remember.
Once the hacker has exhausted this list, they can perform a Dictionary Attack. This mean they try common words from the dictionary with variations of capital letters and numbers, as this is a common way to create passwords.
Did you think G4r4g3 was more secure than Garage123 as a password? Nope. As most people now swap certain letters for numbers, hackers have become wise to this and will try those combinations. G4r4g3! isn’t any better as they will also try adding ! to the end as this is a common password technique.
There’s also the personal and username attacks that are used. For example, to help people remember their passwords, it isn’t uncommon to include part of the username in the password. A user called Robert may try to use a password of Rob3rt22 as he’ll remember that. That’s something the hacker will try.
In the same vein, a hacker will also try to find valid user accounts by trying the name of those people they know work at the organisation, so having a user called Robert Smith with a username or “rsmith”, “Robert.smith” or similar will make it easy for a hacker to find a valid user account in the first place that they can then try to discover the password for using the above techniques.
If all else fails, and the hacker hasn’t compromised the account using the above techniques, they use good-old Brute Force, where they just try every combination of letters, words, numbers etc until they’re in. Given how fast modern computers are, this can be a successful way of getting in unless you protect yourselves from this (which is also very easy).
2. Vulnerabilities in Software
No developer wants to introduce bugs in their code or things that can be exploited but unfortunately it’s a constant 2-way battle between increasingly complex software which becomes exponentially harder to test, and hackers who really pride themselves on find a flaw in complicated systems. This is why companies with deep pockets like Apple, Microsoft and Google pay bounties for any security flaw a hacker discovers in their systems – they actually pay hackers to hack their systems to prove how unhackable they are!
But in the real world, developers can only do their best and fix issues they’re aware of so often a new vulnerability is discovered and a new patch or update is delivered by the developers to patch it. These are called zero day vulnerabilities if they’ve only just been discovered.
So in short, the worst thing you can do is forget about your site once it’s been created. You need to make sure you keep maintaining it with the latest patches, updates and changes to keep it secure. The most common WordPress compromises you hear of will be on sites that rarely become maintained. Sites where the author wrote their articles then haven’t touched it for a while.
Securing Your Site
There may only be 2 vectors mentioned above but each includes a wide range of ways an attacker can use those to get into your site, so you will need to employ a number of changes to secure yourself properly.
1. Update your PHP, WordPress and Plugin versions
WordPress is written using the PHP framework. PHP has been around forever (or feels like it) and wasn’t originally designed with hackers and security in mind, so contained a lot of easy ways to attack sites built with it. It has improved but it’s always best to use the latest version you can. At time of writing the most widely supported version is v8.1 so make sure you upgrade to that ASAP.
WordPress itself is constantly being updated with new security patches and features to make sure you’re using the latest version of that too (v6.2 at time of writing).
Plugins are your only challenge here. If you use a lot of plugins, you will need to make sure they’re all updated to work with the latest WordPress version or they can cause your site to break. This is one of the biggest headaches with WordPress, but checking with the plugin author via their website should tell you if it has been updated or not.
In general, try to avoid plugins that haven’t been updated in the past 1 month as they may be abandoned (as a lot are) so won’t be patched up for new WordPress versions or to fix security issues.
If a plugin hasn’t had an update for 2 months replace it with one that has.
2. User accounts and Passwords
The password attack section was large because hackers have lots of ways to compromise your password, and fast computers to try lots of passwords very quickly. There are plugins you can install to help reduce this risk (mentioned below) but the first line of defence is not to use bad usernames and passwords in the first place!
User names: Don’t use the same user name as display name. The display name is visible on blog entries, comments and posts so if the user name is the same, you’ve told a hacker what a valid user name on your site is and made their job a lot easier! Make them different. Also, avoid just using the account owner’s first name, last name or anything obvious. If a hacker discovers that Bob Smith owns the site (which is easy to do from Facebook or LinkedIn), they will try that as a user name in various forms.
I suggest something random like: happy-coder-9272 for Bob Smith would be ok.
Admin accounts: Never EVER call your admin account “admin”. Just don’t. Or “Administrator”, or SiteAdmin or anything which easy easy to guess. Even with a strong password it will be the target of the hackers efforts as it clearly has full permission so a valuable trophy should they manage to compromise it.
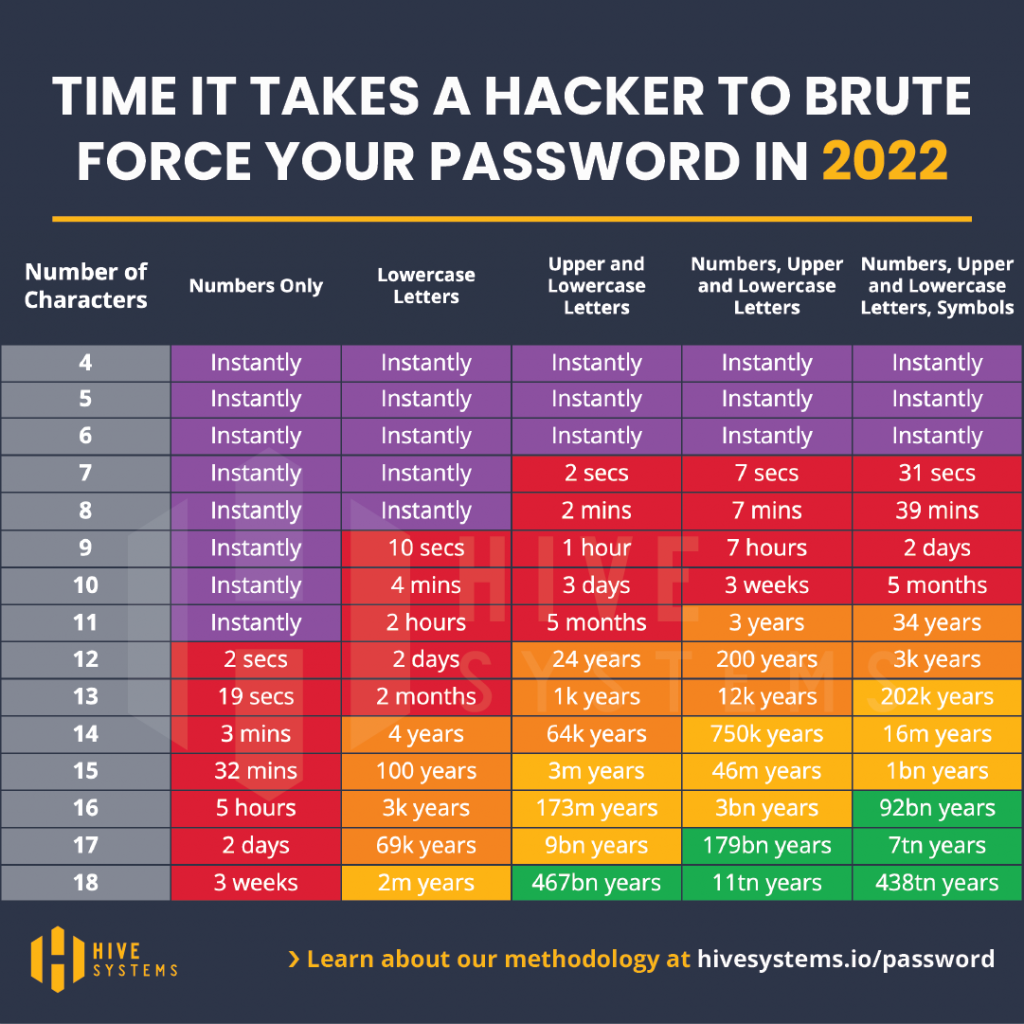
Passwords: Make sure your passwords are long. The longer they are, the longer it takes for an automated attack system to guess it as it takes exponentially more time to guess all combinations of a password for every extra character you add.
Avoid single word passwords, (even long ones) as they’re easy to attack with a dictionary attack.
Try a password that combines words into a sentence that means something to you, even including a few non-letter characters can boost its security massively. E.g. WordPress-needs-updating-Regul4rly is a strong password. Most account systems also allow spaces in passwords which can help.
3. Turn off Comments unless needed
If you don’t need people to be able to comment on your posts, turn it off. It’s on by default usually and gives a hacker an easy entry point into your system to try and hack it. You’ll also receive a lot of spam from Hot Lady Who’s Lonely, or someone in a foreign country who’s a lawyer for an unknown extremely deathly recently deceased relative.
4. Require SSL
If you aren’t aware of SSL, it’s a simple system built into every web browser that secures the traffic to and from your website. It automatically encrypts all requests to your site, and encrypts what your site sends back to the browser which can be checked for authenticity. If you’ve ever seen a web address start with https:// then it’s the “s” that means “secure” and uses SSL.
It’s transparent to you and pretty strong, which means an attacker can’t easily sit in between your browser and the website, pretending to be the other party to try and compromise the site. This is called a man-in-the-middle attack and is common.
The easiest way to turn on SSL is to install a plugin. There are a number of them which will do this, but for reasons I’ll mention next, I recommend the one we use which is Really Simple SSL.
This is a free plugin that will force all requests to use SSL and once activated will ask you to allow it to do this. If a user tries to access your site using http:// (without SSL security) it will automatically redirect them to https to make sure they access the site securely.
The plugin also provides some excellent security features which you really should turn on, but I’ll talk about that soon.
Note about preparing your site for SSL: When using SSL to access the site, if you have links in your site to images, documents or maybe even other sites that use http:// rather than https:// then you’re introducing a potential vulnerability. For content hosted on the same site, you just need to go to each link and change it to https instead and it should work. If you have links to external sites or content that are http:// you may need to see if they support https first (just try putting the “s” in the URL in your browser and see what happens).
5. Monitor Your Site
This may sounds strange, but you need to know if your site is being attacked and how so you can see if the security changes you’re making are actually making a difference. It will also help you understand if they’re a new vulnerability you’re exposed to. Any good admin will tell you how important monitoring your site is, and it’s easy to do.
WordPress by default doesn’t have monitoring built in. I have no idea why as it seems so important, but there are great plugins to do this for you. The one we use is:
Limit Login Attempts Reloaded
Once you activate this you’ll see a new widget on your dashboard and a new item in your settings where you can see a log of all those login attempts, and what happened. You may be surprised to see that for every legitimate login, there are 100 attempts to log in from somewhere in China or a strange unexpected country. As a WordPress site, without proper security in place, this is normal but at least you can see it for yourself.
A great feature of Limit Login Attempts is that they allow you to choose automatic lock-out rules, which is definitely worth setting up. This basically says that after 2-3 failed attempts to log in, you can block that connection (IP Address) from being able to try again for as long as you wish. 60 minutes (we have ours set to 2 hours). After this, any further failed logins will block them for 24 hours which is a great way to hamper the hacker attempts to use automated guessing bots to guess passwords.
If one of your legitimate users do accidentally lock themselves out, the plugin also has an easy way to unlock them immediately and you can also whitelist certain IP addresses which stops the lockout from happening at all.
6. More Advanced (but easy to implement) Hardening Techniques
Rename wp-admin
All WordPress pages have a default login page called “wp-admin”which makes it easy for a hacker to guess where they can target for login attempts. A recommended defence against this is to install a plugin that will rename the wp-admin page to something else so more difficult to find.
Search the plugins list for “rename wp-admin” and you’ll find some good ones, but 2 suggestions are:
Just remember to take a note or bookmark the new login page as it’ll be easy to forget!
Turn off XML-RPC
There are 2 main ways to get into your site from the “front door” (i.e. using a username and password login) – wp-login and XML-RPC. Both are legitimate routes but for different purposes.
- wp-login is basically the wp-admin page (hopefully you’re renamed this by now) and allows someone to log in via their web browser. For manual attacks this is an easy route, but can also be subject to automated attacks. You need to leave this route alone or you won’t be able to log in to administer your site, but renaming it from the default wp-admin URL will help hide it and reduce the risk of compromise.
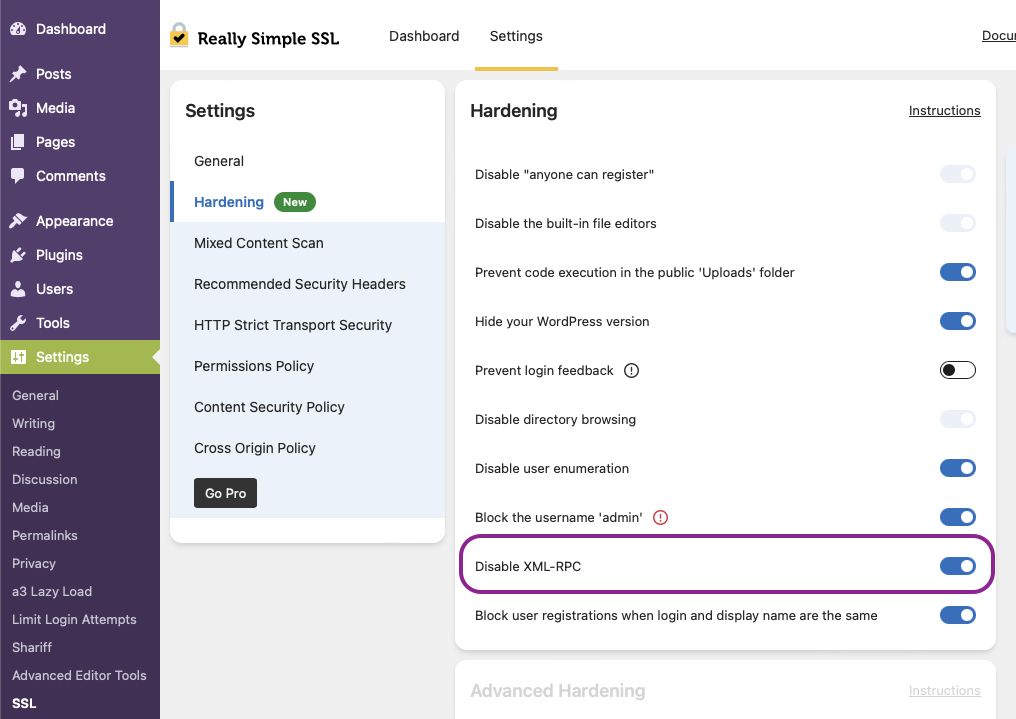
- xml-rpc is used when you have systems that need to integrate into your site to automatically administer it (e.g. monitor it, automate certain workflows by other systems etc). This doesn’t have a web page login like wp-login, and is used by other systems to log in “in the background”. As this can most easily be used by an automated attack system, this is the route they usually use for brute force attacks. Unless you need this (or have a system that integrates to your WordPress site) then you’re safe to disable xml-rpc and it will reduce your attacks by 90%. You can turn this off using the Really Simple SSL plugin.
Other Hardening
Hardening means to increase the security of your site and the above will get you most of the way to a site that is difficult to compromise. The Really Simple SSL plugin we recommended also includes some easy-to-activate hardening options we suggest you turn on.
These options are under Settings > SSL > Settings tab (at the top) and Hardening in the Settings panel of this page (see above screenshot).
I’ve described what each does below:
- Disable the built-in file editors – this stops hackers who are on your site from editing your content if you have plugins that allow this. Usually not so best keep this turned off.
- Prevent code execution in the public Uploads folder – if your site allows files to be uploaded by your site users, this will make sure the file can’t be something that can be “run” (such as a script or executable). There’s almost no reason to ever have this turned off.
- Hide your WordPress version – your WordPress version is relatively easy to discover on your site. Hackers use this information to find sites that haven’t been updated or may be using WordPress versions with known vulnerabilities that can be exploited. The less you can allow a hacker to discover about your site, the less ammunition you’ll be giving them to help get into your site.
- Prevent login feedback – this is an interesting one. Usually you want to tell a user that they’ve entered a bad password or mistyped their user name to help your legitimate users. However, this can be useful to an attacker who is trying to compromise your site. If a bad login tells them that it was either their username or password that was wrong, that tells the hacker that the username exists (or doesn’t) so they know whether to focus on keep trying different usernames or focus on cracking the password if the username is a real one.
It’s a balance between helping your users or helping the hackers. You need to decide for yourself whether to turn this on or not. - Disable Directory Browsing – web servers can be setup to allow the contents of a folder on your website to be listed to the user. Most often this is turned off as it can exploited by hackers to add or modify files in your site.
- Disable User Enumeration – user enumeration is where an attacker uses various techniques to scan your site for legitimate user accounts so they can try to attack known accounts. This is obviously a bad thing but not difficult to do on WordPress sites. Turning this option on (to disable user enumeration) is highly recommended.
- Block the username “admin” – you should never use “admin” for a user account. Turning this on stops you accidentally doing that and will offer to rename any accounts called “admin” that you may already have.
- Disable XML-RPC – as described above, this turns off the XML-RPC support on the site so it can’t be used to attempt logins using automated attack tools.
- Block user registrations when login and display name as the same – this is to support good practice and makes it harder for attackers to find valid user accounts they can try to attack.
The Really Simple SSL plugin also includes other security options which will increase your site security even further but they’re include in the paid upgrade version so won’t be covered here.
By using the above free tools, techniques and plugins, you will strengthen your website against attacks significantly and will be more than enough for most WordPress sites.
But remember, your security is only as good as your users. Despite how often we train our teams to use strong passwords and follow good security practices, your security is only as good as the weakest link.
One final piece of advice is to make sure you spend as much effort monitoring your internal users as the external ones if you want to remain secure.
If your site becomes compromised
A final note on how to deal with the unfortunate (and hopefully unlikely) event that your site is compromised, and how to detect this.
- Your site contains strange content
- Attempts to log into a user account that you’re sure you have the correct password for, is failing.
- Your site is seeing an abnormal amount of outgoing traffic
- Your site is really slow for no reason
- Your site is showing 404 regularly (but not always)
The above are signs that your site may have been compromised, and either being used as a “hub” for an attacker to send their spam or malware from, or maybe that they’re using for their own purposes.
1. If you’re able to log into the site (wp-admin)
Once you can log into the site and access it’s setup, you should immediately do the following:
- Change the passwords of all user accounts. Make sure to choose something long and complicated for each, and make sure no 2 passwords are the same.
- Check for pages, posts or plugins that you didn’t install. Remove them all immediately.
- Update all plugins to the latest versions. If the attacker got into your site through a vulnerability in a plugin, you need to make sure the vulnerability is plugged if possible.
- Update your WordPress version if not using the latest one. This may include your PHP version.
- If you aren’t using the recommended security plugins mentioned in this article, now is a great time to install and configure them!
If the site is a mess due to what the attacker has done, you may need to restore a previous backup of your site first (to before it was compromised) and then do all 5 steps above to secure it and avoid it being compromised again.
2. If you aren’t able to log in
If your WordPress site is hosted by someone such as GoDaddy or Ionos, your first and best option is to contact their technical support team and ask them for help. They have tools and access to your site so will be able to recover it and help you track down how the attacker got into your site.
If you host the site yourself, you will need to use more advanced techniques but if you have backups of your site, you may want to restore it first so you can log in again and follow the steps above.